Web Scraper API
Fetch real-time data from 100+ websites,No development or maintenance required.
SCRAPING SOLUTIONS
Get accurate and in real-time results sourced from Google, Bing, and more.
With 120+ prebuilt and custom scrapers ready for any use case.
No blocks, no CAPTCHAs—unlock websites seamlessly at scale.
Execute scripts in stealth browsers with full rendering and automation
PROXY INFRASTRUCTURE
Over 100 million real residential IPs from genuine users across 190+ countries.
Reliable mobile data extraction, powered by real 4G/5G mobile IPs.
For time-sensitive tasks, utilize residential IPs with unlimited bandwidth.
Fast and cost-efficient IPs optimized for large-scale scraping.
SCRAPING SOLUTIONS
PROXY INFRASTRUCTURE
DATA FEEDS
Full details on all features, parameters, and integrations, with code samples in every major language.
LEARNING HUB
ALL LOCATIONS Proxy Locations
TOOLS
RESELLER
Get up to 50%
Contact sales:partner@thordata.com
Products $/GB
Fetch real-time data from 100+ websites,No development or maintenance required.
Get real-time results from search engines. Only pay for successful responses.
Execute scripts in stealth browsers with full rendering and automation.
Bid farewell to CAPTCHAs and anti-scraping, scrape public sites effortlessly.
Dataset Marketplace Pre-collected data from 100+ domains.
Over 100 million real residential IPs from genuine users across 190+ countries.
Reliable mobile data extraction, powered by real 4G/5G mobile IPs.
For time-sensitive tasks, utilize residential IPs with unlimited bandwidth.
Fast and cost-efficient IPs optimized for large-scale scraping.
Data for AI $/GB
Pricing $0/GB
Docs $/GB
Full details on all features, parameters, and integrations, with code samples in every major language.
Resource $/GB
EN $/GB
产品 $/GB
AI数据 $/GB
定价 $0/GB
产品文档 $/GB
资源 $/GB
简体中文 $/GB

America has 311 million active smartphone users, and iPhones make up more than half of these devices. iPhone users need proxy solutions because Internet Service Providers often block access to certain websites and online content.
Setting up proxy settings on an iPhone isn’t as simple as you might think. iOS devices work with HTTP proxies and need a Wi-Fi connection. On top of that, it helps protect your privacy by hiding your IP address and keeps you safe from dangerous sites.
We’ll show you how to set up and manage proxy settings on your iPhone and iPad. You’ll discover manual and automatic proxy setup methods that work.
A proxy server for iPhone and iPad works as a middleman between your device and the internet. This digital intermediary redirects your internet traffic through another server before it reaches its destination. Websites will see the proxy server’s IP address instead of your iPhone’s actual IP address.
iOS devices handle proxy servers through Wi-Fi settings. Your iPhone sends internet requests to the proxy server instead of connecting directly to websites. The proxy forwards these requests to the destination and masks your original IP address.
It’s worth mentioning that iPhones and iPads only support HTTP proxies. HTTP lets browsers send and receive information. Your iPhone’s proxy settings affect web browsing activities. The iOS proxy settings work differently than other systems – you’ll need to set up the proxy for each Wi-Fi network you use.
You can set up a proxy by going to Wi-Fi settings, selecting your network, and adding the proxy details like server address, port number, and any required login credentials.
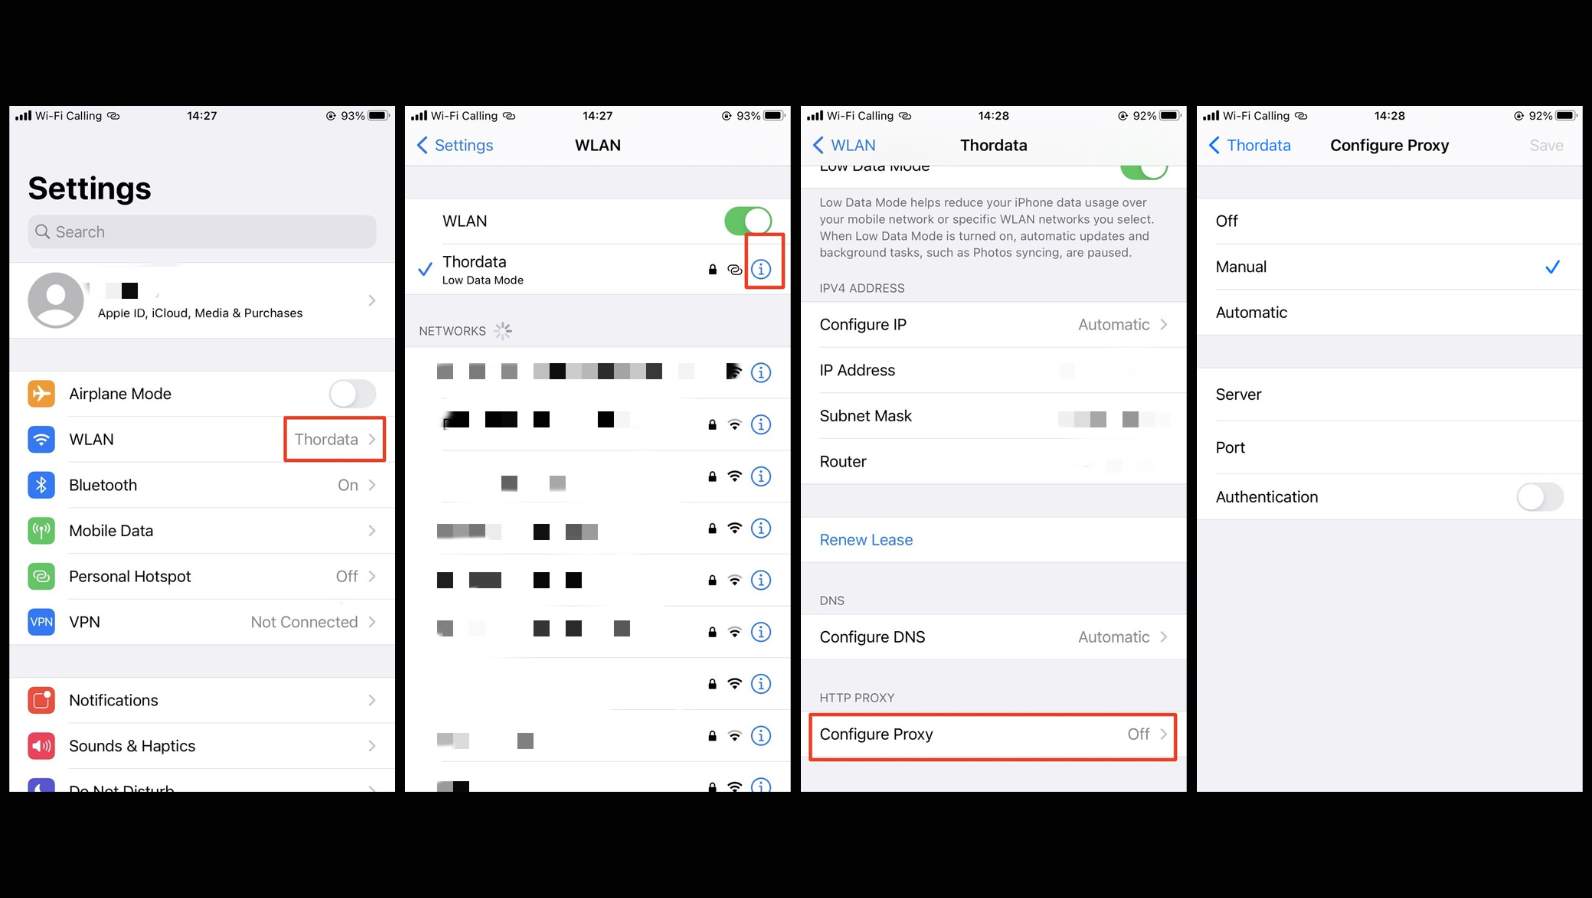
Your iPhone or iPad only allows proxy configuration on Wi-Fi networks. iOS does not permit proxy settings to be used with cellular data. Here’s how to access the network settings:
(1)Open the “Settings” App on Your iPhone
(2)From the main Settings menu, tap Wi-Fi.
(3)Find your current Wi-Fi network (the one with a blue checkmark).
(4)Tap the small (i) information icon next to the network name.
This will take you to the detailed settings page for your Wi-Fi connection, where you can adjust advanced options.
Now that you’re in the Wi-Fi details, let’s set up the manual proxy:
(1)Scroll down to the bottom of the network details screen.
(2)Locate the HTTP Proxy section (or “Configure Proxy” in some iOS versions).
(3)Tap Configure Proxy.
(4)Fill in your proxy information, including the server address and port number.
The setup is complete, but let’s ensure it’s working properly:
Open Safari or another web browser on your iPhone.
A different IP address from your usual one indicates that your proxy is running. Your internet traffic is now routed through the proxy server.If you can’t connect, double-check all the numbers and letters you entered. A single incorrect character in the server address or port number could break the connection.
You can turn off the proxy at any time. Simply return to the same screen and select Off under the “Configure Proxy” option.
Note:
Keep in mind that iOS does not allow you to use multiple proxy IPs on a single network simultaneously. However, you can set different proxy settings for each Wi-Fi network you use. This makes it easier to manage various proxy configurations across different locations.
You can also set up a proxy automatically on your iPhone. After selecting the Auto option under “Configure Proxy,” you will see a field where you can input the URL for a proxy auto-configuration (PAC) script. Once you enter the address, tap Save, and your device will activate the proxy server based on the script.
You might want to turn off your iPhone’s proxy server after you’re done using it. This step matters just as much as the initial setup, especially when you have network changes or connection problems.
Here’s how to temporarily turn off your iPhone proxy without deleting your settings:
Open the Settings app on your iPhone or iPad
(1)Tap on Wi-Fi in the main menu
(2)Select your connected network (the one with a checkmark)
(3)Scroll down to find HTTP PROXY or Configure Proxy
(4)Tap on Configure Proxy
(5)Select Off and tap Save
This quick method keeps all your configuration details saved for later. You’ll find this helpful when you need to fix connection issues or want direct internet access briefly.
iPhone users face frustrating proxy configuration problems. A stable proxy server connection needs proper understanding of these common issues.
Users often find their iPhones ignore proxy settings even after proper configuration. iOS 16 and 17 devices show this problem more frequently, as the system accepts any random proxy IP and port without checking. You can test this by entering an invalid proxy address – your device’s internet connection will still work if iOS bypasses your proxy.
The best solution requires you to completely “forget” your Wi-Fi network:
(1)Go to Settings > Wi-Fi > Your Network > Forget This Network
(2)Restart your device
(3)Reconnect and rearrange the proxy
Network problems that continue need a reset under Settings > General > Reset > Reset Network Settings.
Failed connections and repeated login prompts point to authentication issues. Your iPhone might keep old proxy credentials that you can’t easily remove. iOS sometimes uses administrator credentials automatically, even after you try to delete them.
Check your username and password carefully, including proper capitalization. Turning the proxy off and back on usually fixes login prompt issues by resetting the authentication session.
Your traffic takes longer because it routes through an extra server with proxy connections. Some users have seen dramatic speed improvements by switching from “Off” to “Automatic” proxy configuration. One user reported speeds jumping from 37.6 Mbps to over 150 Mbps.
Proxy servers closer to your location give better performance. Paid services typically provide faster speeds than free options.
Setting up an iPhone proxy might look tricky at first. The process becomes clear once you grasp the simple concepts. Your iOS device’s proxy settings work with Wi-Fi connections and HTTP proxies only.
We hope the information provided is helpful. However, if you have any further questions, feel free to contact us at support@thordata.com or via online chat.
Frequently asked questions
Can I use a proxy on my iPhone’s cellular data connection?
No, iPhone proxy settings only work with Wi-Fi connections. You cannot configure proxy settings for cellular data connections, which limits their usefulness when you’re on the go.
What are the benefits of using a proxy on my iPhone?
Using a proxy on your iPhone can enhance privacy by masking your IP address, help bypass geo-restrictions to access content blocked in your region, improve security by acting as a firewall against potential cyber threats, and potentially provide faster browsing for frequently accessed web pages.
Is It Legal to Use an iPhone Proxy?
In most countries, using a proxy is completely legal. However, it’s essential to use it responsibly. Avoid using proxies for malicious activities or accessing restricted content in violation of local laws.
About the author
Yulia is a dynamic content manager with extensive experience in social media, project management, and SEO content marketing. She is passionate about exploring new trends in technology and cybersecurity, especially in data privacy and encryption. In her free time, she enjoys relaxing with yoga and trying new dishes.
The thordata Blog offers all its content in its original form and solely for informational intent. We do not offer any guarantees regarding the information found on the thordata Blog or any external sites that it may direct you to. It is essential that you seek legal counsel and thoroughly examine the specific terms of service of any website before engaging in any scraping endeavors, or obtain a scraping permit if required.
 Looking for
Top-Tier Residential Proxies?您在寻找顶级高质量的住宅代理吗?
Looking for
Top-Tier Residential Proxies?您在寻找顶级高质量的住宅代理吗?
AI Data Collection: How to Source, Prepare, and Use Data for Smarter AI
Artificial intelligence is onl ...
ning loop. Xyla Huxley
2026-06-24

Proxy vs Firewall: What’s the Difference?
Firewalls and proxies are used ...
Kael Odin
2026-06-23
Building a Real-Time Sports Video Pipeline That Feeds Your LLM Without Getting Cut Off
You need fresh sports video in ...
Xyla Huxley
2026-06-23

The Quiet Revolution: How Sports Video Is Reshaping Multimodal LLM Training Methodologies
The academic community spent a ...
Xyla Huxley
2026-06-23

The $400K Mistake: Thinking AI Model Training for Sports Video Only Needed GPUs
We approved the budget in Janu ...
Xyla Huxley
2026-06-23

Why Your LLM’s Sports Video Understanding Depends on Residential Proxy Infrastructure You Haven’t Built Yet
You spent six months optimizing your LLM’s transf […]
Unknown
2026-06-23

How to Create Original Facebook Ad Creatives and Reduce Rejection Risk
Learn how to create original F ...
Jenny Avery
2026-06-22

Training a Cooking Robot? Your YouTube Data Pipeline Needs to See Every Kitchen in the World
Robotics companies training vi ...
Xyla Huxley
2026-06-18
YouTube Video Collection at Scale: A Complete Python Pipeline with Residential Proxy Integration
This is a practical guide for ...
Xyla Huxley
2026-06-18
