Web Scraper API
Fetch real-time data from 100+ websites,No development or maintenance required.
SCRAPING SOLUTIONS
Get accurate and in real-time results sourced from Google, Bing, and more.
With 120+ prebuilt and custom scrapers ready for any use case.
No blocks, no CAPTCHAs—unlock websites seamlessly at scale.
Execute scripts in stealth browsers with full rendering and automation
PROXY INFRASTRUCTURE
Over 100 million real residential IPs from genuine users across 190+ countries.
Reliable mobile data extraction, powered by real 4G/5G mobile IPs.
For time-sensitive tasks, utilize residential IPs with unlimited bandwidth.
Fast and cost-efficient IPs optimized for large-scale scraping.
SCRAPING SOLUTIONS
PROXY INFRASTRUCTURE
DATA FEEDS
Full details on all features, parameters, and integrations, with code samples in every major language.
LEARNING HUB
ALL LOCATIONS Proxy Locations
TOOLS
RESELLER
Get up to 50%
Contact sales:partner@thordata.com
Products $/GB
Fetch real-time data from 100+ websites,No development or maintenance required.
Get real-time results from search engines. Only pay for successful responses.
Execute scripts in stealth browsers with full rendering and automation.
Bid farewell to CAPTCHAs and anti-scraping, scrape public sites effortlessly.
Dataset Marketplace Pre-collected data from 100+ domains.
Over 100 million real residential IPs from genuine users across 190+ countries.
Reliable mobile data extraction, powered by real 4G/5G mobile IPs.
For time-sensitive tasks, utilize residential IPs with unlimited bandwidth.
Fast and cost-efficient IPs optimized for large-scale scraping.
Data for AI $/GB
Pricing $0/GB
Docs $/GB
Full details on all features, parameters, and integrations, with code samples in every major language.
Resource $/GB
EN $/GB
产品 $/GB
AI数据 $/GB
定价 $0/GB
产品文档 $/GB
资源 $/GB
简体中文 $/GB
Most people buy proxies the way they buy a mattress. They read the label, see a big number, nod, hand over the card. Then they wonder why everything feels off three weeks later.
I’ve burned money this way. More than once. And the thing nobody tells you is that the spec sheet on a provider’s homepage and the actual IP that lands in your scraper are sometimes two completely different animals. “100M+ residential IPs” sounds amazing until the address you pull is sitting on some hosting block in a data center in another country.

So before you commit to any plan – monthly, pay-as-you-go, whatever – run a few tests yourself. Takes maybe twenty minutes with a trial. Saves you weeks of “why is everything getting blocked.” If you want to see what proper hands-on testing actually looks like in practice, the folks doing methodical reviews over at top proxy providers ToProxyLab go deep on exactly this kind of thing, and honestly their breakdowns are a decent template for what to check before you pay.
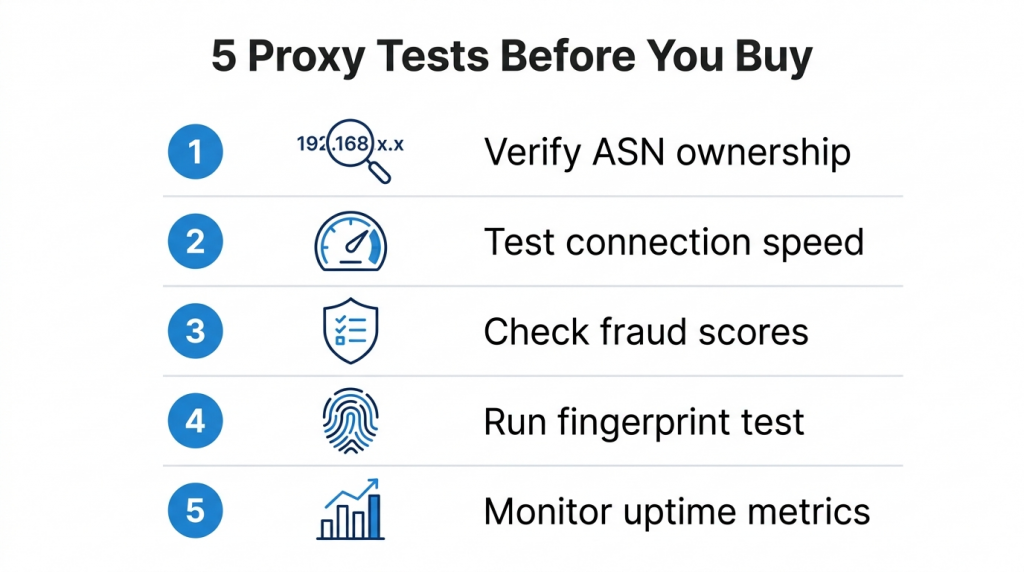
Alright. Here’s what I actually run.
This is the big one. Number one for a reason.
A label means nothing. A provider can tag an address “ISP” or “residential” in their dashboard and that tag is just… a word they typed. The internet doesn’t care what they typed. What matters is how third-party classifiers read the IP – the ASN behind it, its reputation, its history. If you’ve never gone down this road, Cloudflare’s plain-English explainer on what a proxy server even is is a decent five-minute primer before you start poking at addresses.
Pull a live exit IP from your trial and drop it into a couple of independent tools. IP2Location, Scamalytics, that kind of thing. Look at the Usage Type. Look at the ASN. If it comes back as “Data Center / Web Hosting” or it’s flagged as a known VPN provider, you don’t have residential proxies. You have data center IPs wearing a costume. Real residential proxies should resolve to genuine consumer ISPs – that’s the whole point of paying for them.
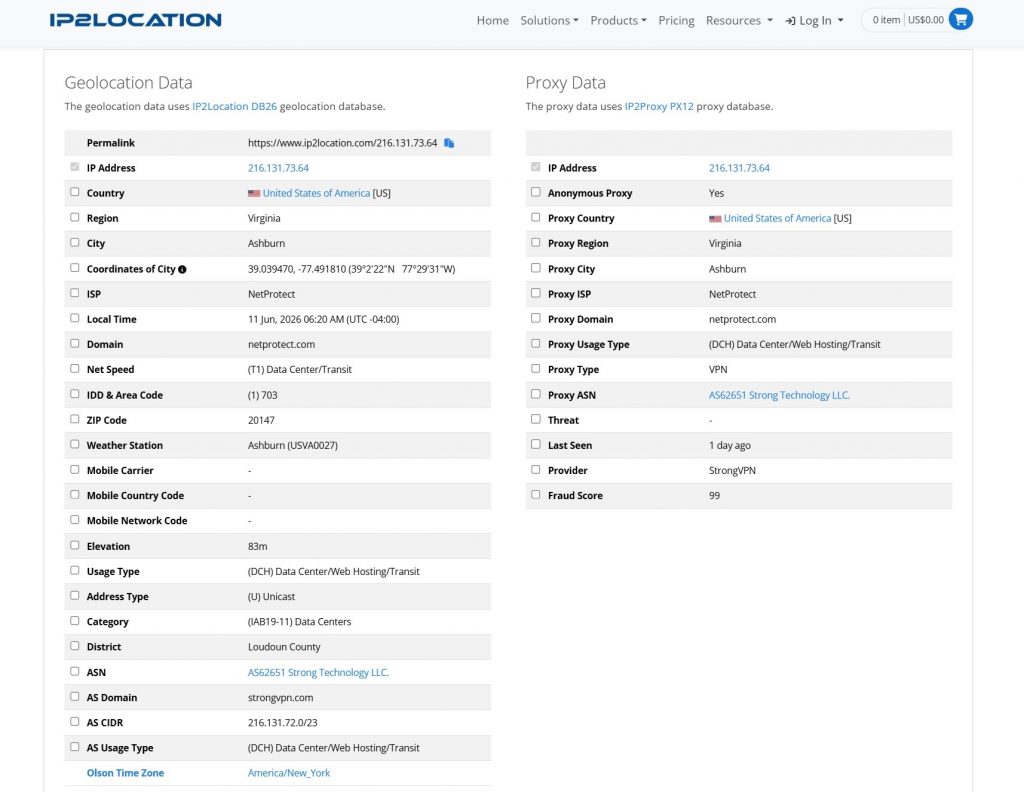
The single most useful number here is the fraud score. Anything pushing 90+ on a scale of 100 means the address is radioactive to most anti-bot systems. You’ll get walls of CAPTCHAs and “access denied” before you even start. A clean residential IP usually sits low – think under 30, ideally near zero.
Don’t test one IP and call it a day, though. Pull five or ten. Pools aren’t uniform. You might get one clean address and four garbage ones, and the average is what you’re actually buying.
Speed claims are marketing. “Blazing fast 99.9% uptime” – sure, okay.
Grab a free proxy tester, load 25-50 endpoints, point them at a real target and watch the numbers. What you care about is the round-trip latency and how many connections just flat-out fail.
Here’s a rough gut-check: solid residential proxies often land somewhere under 1 second per connection, and the genuinely good ones come in way faster than that. If you’re seeing average latency creep past a second and a half, every page load drags, sessions time out, and large scraping jobs turn into an all-nighter.
Failed connections are normal with residential – real devices go offline, that’s just life. A handful of failures out of fifty? Fine. A third of the list dead? Run.
Do it twice with two different testers if you can. When two independent tools agree on a number, that’s not luck. That’s the truth.
Take that same exit IP and check it against the major blocklists. MXToolbox is the easy one – it hits dozens of databases at once.
Now, calibrate your expectations here. A few Spamhaus listings on residential IPs is normal. Genuinely. Spamhaus flags entire dynamic and ISP-owned ranges as a matter of policy, not because that specific address spammed anyone – their own blocklist FAQ spells this out if you don’t believe me. So if you see the address sitting on a couple of policy lists, shrug. For web scraping and social tasks it barely registers.
What you DON’T want is the address showing up across a pile of abuse-focused lists – the ones tracking actual spam and attack traffic. That’s a different signal entirely. That tells you the IP has a dirty past, and you’ll inherit every wall it earned.
One caveat – if you’re doing anything email-related, blacklists matter a lot more. But residential proxies are a weird tool for email anyway, so most of you can keep this in perspective. It’s a secondary check, not a dealbreaker.
People forget this one constantly. You can have a perfect IP and still get made instantly because the browser fingerprint doesn’t match.
Set up your proxy inside whatever antidetect browser you use, leave the timezone, language and geolocation on auto so they sync to the IP, then run a fingerprint scan. Pixelscan is the usual go-to. If you want to understand why timezone and headers leak you in the first place, MDN’s write-up on proxy servers and tunneling covers the mechanics without putting you to sleep.
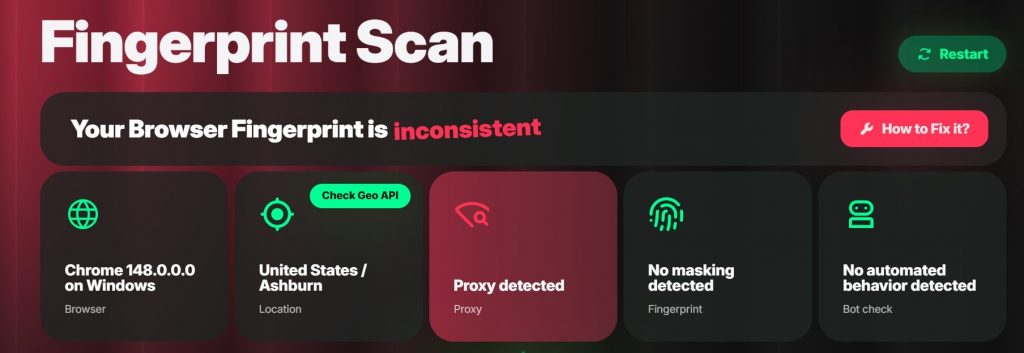
You’re looking for one word: consistent. If it comes back “inconsistent,” or it says timezone spoofed, or worse – “proxy detected” – something’s broken. And here’s the kicker. When the antidetect profile is set up right and the scan STILL fails, the problem is usually the IP, not your setup. A bad address drags the whole fingerprint down with it. The browser did its job. The proxy snitched.
This test is brutal because it’s holistic. It catches the stuff the other four miss.
Less glamorous. Still matters.
Burn through a chunk of your trial traffic, then go stare at the provider’s dashboard. Does the traffic counter match what you actually did? Can you see which domains ate your bandwidth? Is it broken down to the megabyte, or is it some vague rounded blob updated once a day?
Transparency here tells you a lot about the company. Good providers show you everything – requests, targets, regions, down to the byte. Shady ones give you a mystery number that ticks up faster than seems reasonable. If your 1 GB evaporates over a light afternoon of testing, ask hard questions before you load a bigger balance.
Also check the boring stuff while you’re in there. Payment methods, whether traffic expires, refund terms. The fine print is where the pain lives.
That’s the whole routine. IP type, latency, blacklist, fingerprint, usage. Five tests, one trial, no commitment.
And look – I’m not saying every provider that fails one of these is a scam. Pools fluctuate. You might catch a bad batch on a Tuesday and a great one on Thursday. But if a service can’t pass tests one and four, the type and the fingerprint, I don’t care how cheap the gigabytes are. Cheap garbage is still garbage. You’ll pay the difference in blocked requests and gray hairs.
Test first. Pay second. Your future self will thank you.
 Looking for
Top-Tier Residential Proxies?您在寻找顶级高质量的住宅代理吗?
Looking for
Top-Tier Residential Proxies?您在寻找顶级高质量的住宅代理吗?
AI Data Collection Explained: Process, Examples, and Ethics
AI data collection is at the h ...
Kael Odin
2026-07-24

Afina Browser for Stable Proxy Workflows, Multi-Accounting and Web Automation
This guide explains how to thi ...
Jenny Avery
2026-07-23
Oxylabs vs Thordata — Which Residential Proxy Provider Wins in 2026?
Thordata has emerged as a comp ...
Kael Odin
2026-07-22
NetNut Is Down — Why Thordata Is the Reliable NetNut Replacement You Need
a reliable, fully operational, ...
Kael Odin
2026-07-22
Why Thordata Is the Smart Bright Data Alternative for Residential Proxies
If you're looking for a Bright ...
Kael Odin
2026-07-22

What residential proxy IP should I use for job posting and salary market intelligence?
Use a residential proxy IP whe ...
Xyla Huxley
2026-07-21

Which residential proxy IP should I use to monitor ESG registries and carbon credit public data?
Use a residential proxy IP whe ...
Xyla Huxley
2026-07-21

What residential proxy IP can help media companies verify streaming catalog availability by region?
Use a residential proxy IP whe ...
Xyla Hxuley
2026-07-21

Which residential proxy IP should I use for insurance quote QA without collecting private customer data?
Use a residential proxy IP for ...
Xyla Huxley
2026-07-21